Pages

Tuesday, 25 October 2011

I'm loving the new needles

I may have said this before but there was a time when I would have been very surprised indeed to find myself enthusing over a set of knitting needles. 


After all, since amalgamating all my mother's and mother-in-law's needles, I could be said to have more than enough


But so many knitting friends (not to mention the lady in my local wool shop) have been extolling the virtues of Knit Pro interchangeable needles.  The cables come separately in several lengths and the needles in every size  imaginable, all ready to screw into the right length cable for the work in hand.

Well for Plug and Play Pembrokeshire we were asked to bring our own needles (if you read my last post you will already know that the lovely Brenda and Amy provided everything else!).  So - here we have it - the ideal excuse for a treat.


The starter kit had three sizes of needles and I added size 3mm as extra - we were after all going to knit lace.  Well, I knew they were Very Pretty and with all the interchangeability (including the option to use the set in the manner of two long needles using a on one end of each cable) Very Practical but it was not till I began knitting my lace that I found out how Fabulous they are to knit with.


For me knitting is all about tactile pleasures.  In the wool shop, I trail my hand over the alpaca, touch my cheek with the cashmere and test the pure organic wool against my neck for scratchiness, all the while following Elizabeth Zimmerman's advice to pass by the acrylics with my nose in the air.  When I sit down to knit with one of these gorgeous fibres I let out a yoga like sigh of relaxation.  But what joy to find needles that add to the pleasure.  These beauties are so smooth and shiny that the yarn positively glides over them as if on oiled wheels - sooo brilliant. I would like to say that I will never knit with anything else again but it will take me awhile to collect a full set

The Zimmermann project - Part 3

Although I haven't mentioned my Zimmermann sweater for a couple of weeks I am still making progress.  I have completed the body as far as the armholes, simply miles of straight knitting, currently parked on my longest new Knit Pro cable with stoppers on both ends


And have begun the sleeves.  I ripped out my first attempt.  The instructions, to cast on 20% of the body-stitches making the first increase (M1 each side of three stitches marking the underarm) after four rounds then every following fourth round gave me too tight a fore arm.  Not that it didn't fit but I didn't like the look of something so close fitting, particularly as in winter my father wears his sweaters over long sleeved shirts.  

So I began again, still with 40 stitches for the rib (20% of 200) but increased ten stitches evenly over the last rib row then began the increases as described by EZ.  I have also used the two cable needle method to knit both sleeves together in the round for the first time.  Thank you U-Tube! where every knitting technique is explained.  Actually to begin with it was not as simple as it looks in this video clip. I kept getting the yarn looped the wrong way around the needles and the two balls twined around themselves.  On Sunday night, knitting while watching Spooks I managed to knit all the stitches onto one cable, I've no idea how I did that!  But eventually I got the hang of it sticking to three rules


  • follow the needle back to its end each time you change from front to back - you are aiming for two Os one along side the other not a figure of eight
  • hold the needle with the stitches you are about to knit close to the cable with the 'just knitted' stitches - this stops a ladder forming at the changeover point
  • Keep the yarn you are not knitting with at the back of the work


I began making this sweater before I knew the joy of my new cable needles and on a size I don't yet have (4.5) but hopefully when I get to the yoke my local yarn shop will have got the 4.5s back in stock and I can finish the project in style.  

I know I shall have more stitches than I should have when I reach the point of joining sleeves to the body and knitting up the yoke but I will deal with that when I come to it (and let you know!)

xx

C


Tuesday, 18 October 2011

Knitting in Wales

I'm just back from my first ever knitting course taught by stars of the knitting world Amy Singer and Brenda Dayne.

I thought travelling to Pembrokeshire for the weekend was a pretty big stretch from Hampshire but NEW HAMPSHIRE???  I met Laurie as we arrived at the run down railway halt nearest to the hotel.  It seemed to be in the middle of nowhere (except it did have a very very good yarn shop).  I was amazed when she told me she had come from Maine (not New Hampshire, but you know what I mean) , flying over just for the course.  She knew so much about our teachers I was ashamed to admit that a friend had suggested we go to the course and I knew no more than that.  In fact  nearly half the women who attended came from the USA, travelling miles to attend classes given by such well known and admired knitters.

And here they are in front of the lovely hotel in Pembrokeshire where we stayed and where we learned  the essentials of a beautiful lace shawl and a perfectly fitting sweater.


(You'll have to look here to see what they were photographing)

We had goody bags!


(With three hanks of super quality yarn but my third hank is already a work in progress)

We had our own yarn shop


(NiMu as well as Fiberspates)

And Show and Tell


But above all we had good teaching.  Amy Singer taught us about her brilliant tool for taking any lace pattern and adapting it to the shape of the garment you want to make.


We did lots of charting and swatching.  There was a much rubbing out of charts and ripping out of swatches till (with Brenda's and Amy's help) we got it right


Brenda taught how, with a few key measurements, a calculator and knowing the knitting tension (gauge) of the yarn we were using we could make the perfectly fitting sweater.


I have chosen some fabulous lace weight merino wool, cashmere and silk mix from NiMu for my sweater.  I can't begin that yet as I need plenty of time to get the basics right - probably emailing Brenda a few times till I feel confident to launch into the project but I'm all occasionally for delayed gratification


The surroundings were beautiful, the view from the Orangery where we worked was lovely (who says it always rains in Wales!)


the neighbours were curious but friendly


we even had time on Sunday evening to watch Downton Abbey together (I wonder what Lady Mary would make of such enthusiasm for knitting)


But most of all we knitted and talked about knitting, even while waiting for dinner to be served


Thank you Amy and Brenda for a really special time

xx

c


Friday, 14 October 2011

The Liberty Book of Home Sewing

I have had a life long love affair with Liberty.  It's where I bought the fabric for my first ball gown, the circlet of wax flowers and yards of silk tulle for my wedding veil and Tana lawn for my little girls' first summer dresses.  The Liberty Book of Home Sewing by Lucinda Ganderton published this month by Quadrille is more than a manual of instructions for cushions, bags and curtains, it is like owning a little bit of that fabulous shop.


I guess you might expect any book with Liberty in the title would have plenty of beautiful illustrations of their exquisite prints but this book excels itself with a fabric cover, gorgeous endpapers, double page reproductions of designs at the beginning of each chapter and a directory of prints at the end.  Kristin Perers' photographs are positively delicious

The instructions for each project are very prettily illustrated.


And there is plenty to lust over, like this luscious silk kimono


As any regular reader of my book reviews will know I like to test drive the books I review to make sure I can recommend them to you as a guide to making things of beauty and utility.  The instructions for the projects must be clearly written (and work!) as well as be something lovely to look at.

One day I will make the kimono - in exactly the same silk as illustrated.


But, not having the silk to hand, on rummaging through my fabric stash I found enough white and spotted linen to make this very practical apron.


The design is great, the pattern very easy to draw and the cutting and making up instructions spot on. It took me about an hour to make.


I love this book, leafing through the illustrations, reading a little of the shop's history, it conjures up all my visits to Liberty.  Climbing the wide creaking oak staircase, sauntering through the fabric department checking the feel and colours of the Tana Lawn and lingering over the matching print wash bags and the cushions.  If you share my Liberty obsession (or would like to discover an extraordinary emporium and grow to love it) you can, and with the help of this book, make your own cushions, make-up bag and  curtains to boot!

The book is out now, published by Quadrille.

Enjoy!

x

C


Tuesday, 11 October 2011

You can't knit with that... can you?

 The thing about an obsession is, you tend to look at everything in a different way - in a way that encompasses the possibility of incorporating ordinary every day objects into the obsession.  I was joking when I blogged about knitting place-mats out of spaghetti on the first of April this year,  but I have to confess I have always looked at those pliant strings of 'aran weight' flour and water paste and wondered if they could be knitted with.

So it's only a small step to consider the knitting (or crocheting) qualities of  string


Then there's ribbon


Now wire and beads, there's a possibility


And why not all three?  Does any one else remember a time before every shop gave you your shopping in a plastic carrier bag? (and then they didn't).  My mother had large willow baskets for shopping but my father, who took me shopping to the nearby town every Saturday morning for the weekend bread wanted something he could stuff in his pocket - a string bag.  Mr Ptolemy Tortoise also used his own bag when he took lettuce to Mr Jeremy Fisher's lunch party.  Trying to remember my father's shopping bag I made up the  pattern, using chains and DCs, as I went along.


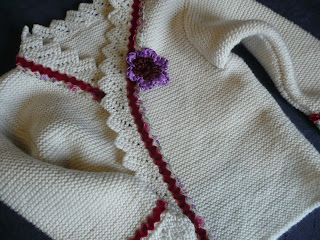
I have taken rather a long time to finish off the Little Model's cardigan It has been sitting in my work basket waiting for me to trim the edges with some velvet and floral edging.  A ribbon flower button hole to go with the velvet trim perhaps?


But the most fun of all was the wire and beads.  I have seen jewellery making projects with knitted wire before and longed to have a go


I'm not sure that I will ever give up knitting with fabulous, soft and silky wool, silk and cottons in all their multiple incarnations but I had fun with this project.

The bag adapts readily to its contents


The cardigan is ready to go


And the table laid with white china linen and new napkin rings


The napkins are made out of beautiful rose patterned damask inherited from my mother.  But it was not till I was ironing them this morning that I noticed that they must have been handed down to her.


E. Spicer 12. Mr and Mrs Spicer were lifelong friends of my parents.  My father and Mr Spicer had met in the cyclists touring club in Newcastle upon Tyne in the 1930s and every year until first Mr Spicer then his wife died they would come and stay with us before travelling to stay with their daughter and family for Christmas.  Their visits felt like the start of Christmas for my brother and I. I have no idea how my mother came to have some of their napkins (I have four of them, all marked) but as my parents married in 1952 when rationing was still in force I wonder if some of their presents would have come from their friends' linen cupboards. They must be made of fabulous quality fabric as there is not a single sign of wear and they are as white as ever. 

The Zimmermann project - part Two

After checking out my gauge/tension the next step was to calculate the number of stitches for the body of the sweater. I am making it for a 38inch chest with an extra 2 inches for comfort - thus 200 stitches.  EZ says in my book that the number is nearly always 200, I don't know how she comes to that conclusion but it is right for me.  She also says that 'this is almost the only measuring and deciding you will have to do yourself' as from then on all you have to do is follow the percentages she has worked out.

I actually began by reducing the number of stitches by 10% for the rib, 180 stitches, increasing one stitch every nine inches on the last rib row, to keep the waist of the sweater snug.  I have already knitted up three balls and am about to begin the fourth


The size is looking fine, I slipped half the stitches onto another round needle and tried it on JTH (he is one size larger than my father) and it looks fine.  But I am also keeping a note of what I do -  in case I want to modify the number of stitches, snugness of the rib etc, next time I will know exactly what I did at the first attempt.


xx

C

Tuesday, 4 October 2011

New beginnings and new lessons

Given what a grubby disaster last week's effort was, I was really heartened by all the people who read and commented, thank you so much all of you.  It was lovely to read all your comments, including the ones on twitter and facebook.  Even one of the tutors from the course I am going on in two weeks reads my blog - wow!  Despite your encouragement, sadly the one thing I cannot do is up-cycle it in some way.  Neither use it for a cushion cover (well not one that I would display proudly) nor unravel it and make something else.   Because although it did not felt, it did mat and shrink and the colours ran to variable tones of sludge.  Currently it is chucked under my desk, perhaps I can use it for a foot warmer as the weather gets cooler!

It was Sarah who got it quite right, you cannot felt wool described as super wash.  Obvious really.  And Jenny at knitting group reminded me of the perennial must - 'you have to make a test swatch'. So I have now, just a tad late I admit.  I don't really have time to do more experimental stuff, I must get on with making Christmas presents, but I just wanted to have one more go.  In my original effort I used some left over alpaca for the top row of crochet - it was the only bit that felted, giving the bag a slightly drawstrung effect.  So rummaging through my stash I came across three more balls and made this, 14 cm square.


I started gently this time at 30deg with woolite


 Not there yet so back in at 40deg and a big towel to give it the required bashing


Done - to 9cm- and a mental note that if I buy say three more balls I can have another go at the bag once I have some time.

Now, to Christmas presents!  

It's a little tricky to blog about this because some projects may be destined for friends and family who might just read about their presents first here and that just will not do.  I am a stickler about presents being surprises.  But I am quite safe with my father's sweater, he's 85 and never owned a computer in his life!  

One of the regular readers of this blog and someone who occasionally e mails me to ask a question asked last week about knitting a baby cardigan from one of the books by Elizabeth Zimmerman. This sent me flying to my introductory book by EZ - Knitting Without Tears and I realised perhaps I could answer Caroline's question, make my father one of the seamless sweaters in the book and blog along the way.  

Caroline's question was to do with sizing.  She said that the only information E Z gives is '5 stitches to an inch' and, as she said, how does that translate to all the various sizes a baby can be?  

Elizabeth Zimmermann, is a huge inspiration and practically the Empress of knitting.  I think what I love most about her writing is the joy she can project, even in her chapter on washing your knits.  But one thing that is said about her that is so true is that her patterns contain not so much instructions as suggestions.  At first it appears she is not very precise in her suggestions but once you get into her way of thinking the results can be brilliant.

5 stitches to 1" is about tension (or gauge as EZ calls it) not sizing but it is where everything about the correct fit begins.  So here is what E Z says about 5 stitches to an inch and what I did


          What E Z says
         What I did


  • [No instructions as to what weight of wool given] If the directions specify a gauge of 5 stitches to one inch, take any size 16" circular needle from 3.5mm – 5mm and cast on about 90 stitches, work 3-4 rows in pattern
  • I am knitting with Sirdar Balmoral (DK in wool, alpaca, silk mix).  Using a pair of size 4.5mm needles I cast on 22 stitches and knit 28 rows.  This is what the ball band said I would need to do to knit a 10 cm (4”) square


  • Take out the needle and lay the work flat
  • I cast off loosely. 


  • With a ruler measure off 3” in the centre of the knitted fabric and place two pins exactly 3” apart
  • I pinned the square out on a flat cushion being very careful not to stretch the work and keep the sides and top and bottom square


  • Count the exact number of stitches in between the two pins.  Do not neglect to count half stitches or even one-third stitches, if there are any
  • I placed a ruler over the whole square, it was 2 stitches more than 4”.


  • Divide the number of stitches by 3,     15 sts will give 5sts to the 1”

  • I have 20 stitches in 4” - so 5 stitches to the inch


  • Keep changing needle size until you achieve the correct gauge
  • yes!


I didn't exactly follow the E Z suggestions mainly because I was too impatient to cast on 90 stitches but I did follow in spirit, knitting  loosely and counting carefully and precisely.

That's gauge (tension), next week I will work out how many stitches I need to begin with, cast on the body and begin knitting.

xx