Pages

Showing posts with label vintage. Show all posts

Tuesday, 18 February 2014

Knitting 1914 to 2014

A few weeks ago I chatted on here about Southampton University Library's wonderful vintage pattern resource.  Well as a consequence of registering with the library I was invited to the private view of this exciting exhibition .  It's on till April 4 and if you can get to the Hartley Library at the university may I encourage you to make a little detour to have a look, it's well worth it.

knitting for the war effort
1914, such a terrible, momentous year,  and there are all sorts of events commemorating the out break of the first world war but  I love it that the gentle art of knitting is included.  Knitting was something that the women who were left behind, worrying, could do for the fighting men.  Hats, socks, gloves ,and scarves must have been so welcome to the soldiers freezing in the trenches, not only to help keep out the cold but as an indication that the people at home were thinking of them and cared.

bandage
As a former nurse, used to modern dressings, I have often wondered how knitted bandages could be useful, it seemed to me that they would be too stretchy.  But I can see that this example in garter stitch, knitted on very fine needles, would hold a dressing in place.  The terrible wounds inflicted by military ordnance would have needed very large amounts of gauze and lint, and very big bandages.

The text panels in the exhibition explained how knitting for the troops in the second world war was more organised with the issue of official patterns like these


These photographs are just a hint of what you can see and I won't spoil your enjoyment by telling you the whole story but it is not all historic either.  On show is this fabulous piece of knitting art work


And this traditionally inspired sweater that features in one of the Rowan magazines


Often the best bit of such events is the conversations one has, I met knitters and potential knitters, men and women and we discussed the objects as well as out own knitting adventures.  I was thrilled to meet the curator of the show and she was generous enough to let me rabbit on about my plans for a small vintage display at my town's festival in the summer.  I was shamelessly wearing my fingerless gloves and she very kindly admired them.

And so I'm planning to visit the pattern collection very soon.  Meanwhile I am swatching for my next vintage project - a 'cloud'.  There is a pattern for one on page 26 of A Knitters Companion but to give a flavour of what a cloud is I love this quote from No Idle Hands by Anne L. Macdonald 

A great deal of coquetry was indulged in by the red-cheeked bright-eyed girls in the adjustment of the cloud.  It might be bright red, in colour, or pink or blue or white.  It was always puckered in at each end and finished by a fluffy tassel.  It was wound around the head two or three times ,then around the neck, several times, and the ends, with the swinging tassells, thrown jauntily over the shoulder.  A fresh, young face, framed in such fleecy fluffiness was like a new-blown rose.
All very Gone with The Wind! And quite a long message for a simple scarf!  My cloud will be red, in this vintage 3 ply


I think the 'vintage' of this yarn is probably 1950, a cool 150 years younger than the pattern in The Knitters Companion which gives two stitch patterns. I have tried out both in my swatch (the stocking stitch section is just a divider and not part of either pattern)


The pattern at the top of my swatch is perhaps a little too subtle for photographing but is a pleasing lattice forming a gentle zig-zag, I think I shall use this one and report back to you as I make progress.

xx

c

beautifully worked swatches from the exhibition


Tuesday, 31 July 2012

Wearable vintage

I began making this sweater just for fun, a challenge to myself to see if I could knit something from a photograph.  This photograph


Oh no! not this one... this one is mine - three months of thinking, planning, writing notes and crossing out
and I got there -

from here...


via here...


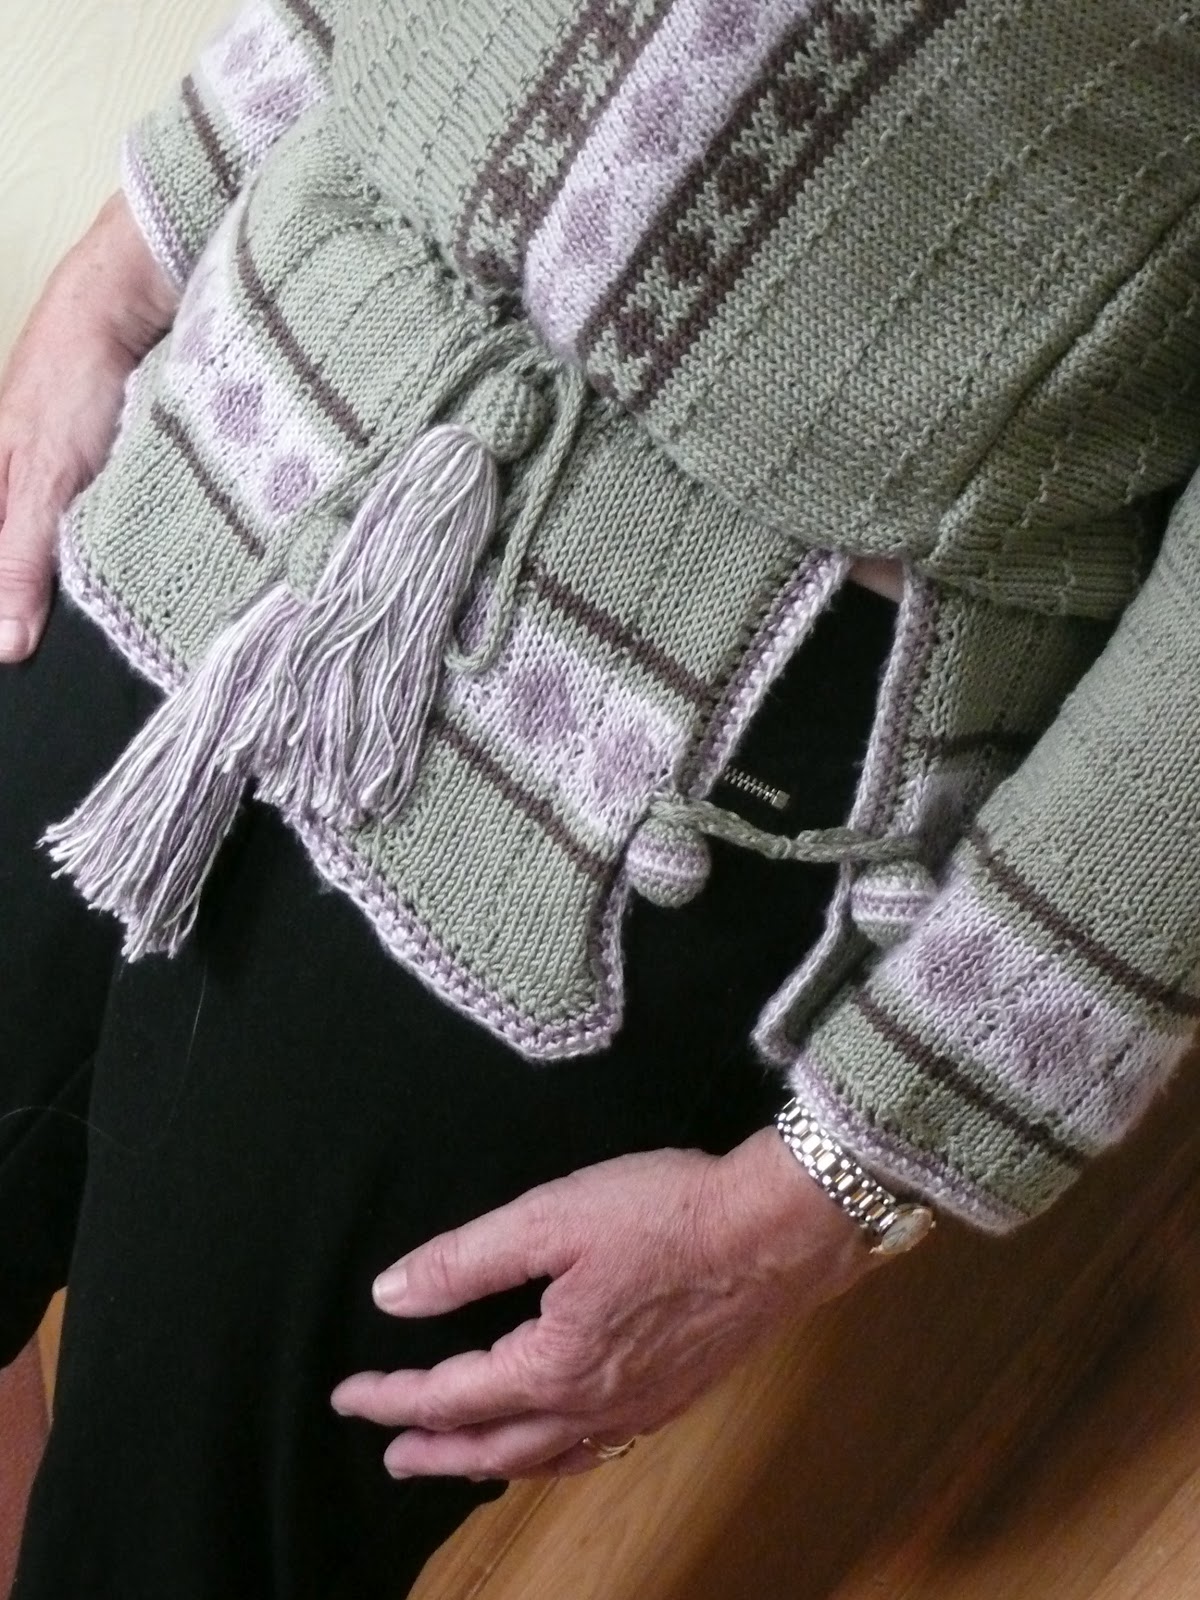
I have simplified it, by knitting the main body sideways from cuff to cuff via the front and back I could knit the colour work panels fair-isle fashion and not as intarsia, much quicker.

The finished piece was HUGE and took over half the dining-room floor when I blocked it. Sewing up took ages too.  Does anyone else use safety pins for this?  It made it much easier to keep the lines matched up


All the little crochet detail were interesting too.  The fillets at the shoulders allowed for some fullness rather in the same way as one gets from a shirt with a yoke


And I loved the bobble buttons


and the tassells


Loved making them too


When I joined the Titanic sewing project the choice of patterns was wonderful but when I looked around there are far less things to knit.  Hats gloves and mufflers a-plenty, baby things too but not actual items of women's clothing.  Perhaps knitting was mainly confined to shawls and working men's sweaters.  So I was thrilled to find this which is spot on for the period.  Spot on for the style too.  I realise that many of the women in steerage would have kept themselves warm with a shawl but the patterns we are making up are more of the style of the 2nd class passengers and although this tunic is probably designed by Poiret, someone who would have dressed the first class passengers, I see no reason why a 2nd class passenger who was able to knit could not also copy.

My mannequin, still decked out in 1912 blouse, skirt and underpinnings wears the tunic well.


I too shall wear it, with something more modern such as a pair of straight legged jeans


The pattern I devised is available as a Ravelry down load if you would like to make one too.  If you do please let me know - I would love to see other versions

xx

c


Tuesday, 3 July 2012

On having to admit that these clothes maketh this woman into a Grandma

Of all the discoveries I have made while working on the Titanic project I did not expect to be seeking out the Brasso


But more of this later...  The latest Titanic project felt a little like going off piste without a map.  The #0219 blouse which came with pattern and a photograph but no instructions


Now I've made plenty of blouses before, with collars and cuffs and curved yokes, even one from the project how hard could it be?

The pattern size was several inches too small for me so I slashed the pattern and spread it to give me 4 inches extra all round.


This piece is side front and back and one sleeve, cut on the cross (bias).  At this stage I imagined the slashes at the underarms were darts but did wonder why the pattern numbers did not match up...

(NB these patterns do not have balance points as we know them in modern patterns but there are numbers at strategic points on each piece and as you sew you match 30 to 30, 31 to 31 and so on)

So I went merrily on my way, interfacing the yoke and centres, collar (cut from white medium weight linen) and cuffs with light weight fusible interfacing


Attaching the piping to the centre front, yoke, and centre back section first using the cording foot of my machine.  Then, with the same foot attaching the yoke after clipping curves and corners


Next comes the underarm  and side seams - EEK! they do not match in length and that slashed part is not a dart.  Saved by the project blogs, people have gone before me.  The seam from hem to cuff does a sort of dog-leg turn at the underarm.

I still found it tricky.  Particularly as my fabric is a very fine floaty 50/50 cotton silk mix and frays very easily.  In the end I machined the sleeve from cuff to the turn and the side seam from hem to turn then stitched the horizontal piece.  At first the seam looked puckered and you can see that it is made of 3 separate lines of stitching.


But after pressing and when on a real arm rather than my dummy it fits quite well


Now buttons and button holes (and Brasso).  A friend from my knitting group had given me some vintage buttons and this blouse seemed the perfect garment for the set of grey Bakelite ones.


Bakelite was developed in 1907 and patented in 1909 and is the first ever plastic.  It was not actually produced commercially till the 1920s and 1930s (certainly in any great quantities) but the buttons are nearly from the right era.  Although there is no Bakelite label anywhere,they are certainly of a plastic like material and have the characteristic bloom that develops on old Bakelite. So armed with the tin of Brasso which according to a website for collectors of Bakelite is The Thing for cleaning it up I got polishing with nice shiny results.


While I'm on the subject of buttons, I fund three white buttons styled like collar studs in my button boxfor fixing the collar to the narrow bias neck band, two at the front and two at the back


I have found that patterns of this age tend not to supply pattern pieces for parts that are simply a rectangle, square or strip, the instructions simply giving measurements.  And here I needed to improvise for neck band, cuffs and binding for the lower edge.  

The neck edge I bound with a bias strip, applied not as a facing but as a stand up binding to give something to button and snap the collar on to.  As well as the button at the back I attached press studs to the front and sides of the band and on the collar.  Securing at these four points seems to keep the collar in place neatly

The cuffs were easy, choose your depth, measure your wrist size, add 1.5inches overlap and seam allowance to all four sides, cut four.  I slashed a 3 inch sleeve opening about 4 inches up from the underarm sleeve on the outer aspect of the sleeve, binding the raw edges with a strip of bias binding cut from the main fabric.   Gathering the lower edge of the sleeve to fit the cuff, less teh overlap I attached the cuff in the usual way

For the lower band I decided to make a wideish band that would sit comfortably on my waist and lie flat under a skirt waist band so I cut a 5 inch wide strip the length of my waist measurement plus 2 inches for overlap and seams.  I gathered the lower edge of the blouse (side front and back sections only) on to one edge of the band making sure the overlap matched that on the blouse itself, folded it in two, machined across the ends, snipped corners turned it right side out and  turned and hemmed the inner long side to the line of machine stitching.


Now for the great try on.  I decided to wear it with my scallop edge skirt and with full underpinnings.  How exhausting is that dressing in chemise, corset and  princess slip before getting to the top layer?  I needed a short rest while still en dishabillé


And here we come to the meaning of my bog title.  I really look like a grandma once properly buttoned up


And since I do, I thought I would add the glasses


Now for the VPLL1912 checklist


VPLL Checklist
  1.  Pattern Name Ladies blouse #0219
  2. Sewer’s Skill Level: Advance, 
  3. Pattern Rating:  4 - I nearly loved it as much as the #0335 blouse.  It is perfectly right for the period but it drops a point for lack of glamour.  I realise everyone has to have a workaday blouse and this one says school marm all over it but I do prefer the chance to use lots of lace and the feel of very wide sleeves.  But in technical terms the pattern certainly deserves a 5 as it went together perfectly.  Given the eccentric way I worked the underarm and side seam if the measurements were not exact it would have been all over the place
  4. What skill level would someone need to sew this pattern and why? I say advanced because of the under arm bit but probably if the blouse is made in some sturdy cotton poplin possibly the tricky seam would be easier to work
  5. Were the instructions easy to follow? No instructions of course but the blogs were very helpful
  6. How was the fit/sizing?  The sizing was accurate and by adding the 4 inches as described above it was a perfect fit for me (I am 2 sizes bigger than the original pattern)
  7. Did you make any pattern alterations? yes, 
    1. I made the pattern bigger as described above 
    2. I made the collar stand from a strip of bias binding.  Another time I think I would have used the white linen I made the collar of and make it slightly wider (say 3/4 inch)
    3. I made the waist band wider than a simple binding, it stayed put better under the skirt.
  8. Other notes
    1. I machined the button holes - big confession I know, there were no machine made button holes in 1912 but I had 15 to make and I needed to save time
    2. I made the bow from a wide bias length of silk crepe de chine sewn into a tube, turned and loosely tied into a bow


xx

C


Thursday, 24 May 2012

Titanic #6 A dress for a ittle girl

The fascination for vintage children's clothes is a little like the interest in vintage underwear.  While there is so much information about what the grander people in society wore less is known about what they wore underneath, much less what the children wore.  Although you can see from portraits that for much of history children wore a cut down version of what was worn by their parents, I often wonder how the little infanta could play when wearing all that stuff, very beautiful but oh so restricting.

But by the beginning of the 20th century still the clothing was nothing like as free and comfortable as it is today it was certainly more relaxed.


So this dress from the Vintage Pattern Library 1912 project was a perfect chance for me to learn a little about how children's clothes were made a hundred years ago.  I chose a soft cotton gingham with plain lawn for the contrast and, as an extra, some multicoloured polka dot from my quilting stash for the piping (I found some spotty buttons too!).

Making it to fit my Little Model I needed to reduce the chest size from 24" to 20".


So many pattern pieces! Slashed and lapped at two points on each piece to avoid the bodice becoming disproportionate.  When I made pretty much all my children's clothes quite a few years ago, I wanted to make them smart and attractive but also FAST - after all no point spending weeks making something if the child grew faster than I could sew.  This pattern is not a fast make, there are so many small details.  I decided to bind as many of the edges as possible.


The yoke with a bias trim and a second piece called a chemisette set above the main bodice up to the bias bound neck did not work out right first time around.


No matter how much I steamed and pulled and pressed it would not lie down flat. I cut it apart, remade the chemisette and this time stretched the lower seam as I sewed and things went a little smoother.  I chose not to use lace for the chemisette and under sleeve.

I closed the back with press studs and a hook at the waist sewn to a placket made with more of the bias trim


I loved making the little button and loop trim (bias strips again, folded into a mitre and fixed on with the button)  despite there being so many of them!


Of all the pieces that I had to fit together, the sleeves were the most tricky.  If I found the crown of the sleeve and matched it to the shoulder seam I was left with just too much fullness on one side of the shoulder seam and nothing on the other.  And were the underarm seams on the sleeves supposed to match the side seams on the bodice?  I  needed a balance point on the sleeve pattern to correspond with the shoulder seam and another to indicate where to match the underarms.  What I should really have done is make a muslin!

On reflection I should have done this *
  • Calculate the balance point on the crown of the sleeve as exactly half way between the small circles which denoted the limits of the sleeve head gathering. 
  • Taken a long look at the bodice and decide where to put the under arm sleeve seam (point #96) I now think it should be somewhere towards the front about 1" up the curve of the arm hole on the front yoke match point 89.
 The instructions were clear but I would suggest the following modifications**
  • Cuff Bands - the instructions are to cut 2 pieces 10" x 2" this is just too short I cut mine 11" but you would get away with 10 1/2
  • At Point 4 I would suggest the bias trim needs to be stretched and eased in to prevent little pleats forming at the neck
If anyone is redrafting the pattern I would suggest numbering a sleeve crown balance point 81 to correspond with the same numbers on the shoulder seams of the yoke and marking a new balance point about 1" up from point 89 on the curve of  armhole on the front yoke

I also felt that the upper bodice was too long, it had to be  gathered on to the lower edge of the bodice lining, together with the skirt.  But this achieved too flouncy an overhang, not like the illustration at all.  I realised (too late!) that I had not reduced the width of the skirt to match the reduction in the bodice which accounted for the extra flounciness but that still did not explain how instead of gently falling to the belt it covered the belt completely. ***I suggest that if the lower bodice is cut 1 1/2" only longer than the bodice lining it will look more like the illustration.


But the Little Model loved it and posed very cutely on a rocking horse to show it off


Then I had an idea how I might make a modern version for wearing today.  I dispensed with the bodice lining and the skirt section.  I cut two each of the front and back yoke to sandwich and cover the gathers from the lower bodice and fixed the skirt flounce with the contrast band trim directly to the lower bodice.  I made little cap sleeves from an ellipse shaped piece of fabric folded in two sandwiching the raw edges around the arm holes and between the two layers of the front yoke.


It looks so different but apart from the sleeves the only difference is the loss of one tier in the skirt (no need for a belt either).  In fact I think the original will be very wearable if I just remove that layer in it too.

And here's the science bit

VPLL Checklist
  1. Pattern Name - #0501 Girls Dress March 10, 1912
  2. Sewer’s Skill Level: Advance
  3. Pattern Rating:  3 – Good/Average, to score a 4 it needed the balance points mentioned at * above and for a 5 the lower bodice length needs sorting out
  4. What skill level would someone need to sew this pattern and why? Advance - the sleeves were tricky and the neckline only for the brave
  5. Were the instructions easy to follow? yes  but see ** above for my suggestions for some small improvements
  6. How was the fit/sizing? Did it correspond to what you thought? Yes - my model is very slim and not yet 3, but this size would be fine for an average 3-4 year old.  The big problem on fit/sizing is the excessive overhang on teh lower bodice, I suggest a modification at *** above
  7. Did you make any pattern alterations? If so, what alterations did you make? Where they fit or design alterations? - I made fit alterations as mentioned above
  8. Other notes: I was very pleased with the modern take on the pattern

xx

C

only two button loop trims on the modern version

Tuesday, 17 April 2012

Procrastination

I just cannot bring myself to throw the tulips away


In their almost dead, petal dropping state they are still so beautiful.  Like some fading society beauty photographed by Cecil Beaton.

I am the master of procrastination.  At university, despite being a mature student (a 38yo mother of 4 when I began my first year reading law at Cambridge) I very quickly mastered the art.  I know I should have known better but...

Supervision to go to - hours spent in the law library photocopying the cases and articles I needed to read before the 4pm deadline - reason, 'I could not work in the library needing the comfort of my room, coffee and biscuits before I could concentrate'.  

Essay to write, ditto photocopying and a whole packet of cadbury's boaster choc and hazelnut cookies.  

Exam revision- a master class in procrastination 
1. I needed to give the children some mummy time over the Easter holiday 
2. I could not begin to revise until I felt enough anxiety to give me the necessary drive 
3. I have to have a set of spiral edged notebooks (one for each paper), A5 size, a set of highlighter and half a dozen pencils and a pencil sharpener.  
4. day 1 of actual revision, sharpen all the pencils (and repeat as necessary between bouts of doing the actual revision)

Many years on I am unreformed.  At the beginning of the year I resolved not to have so many knitting and sewing projects on the go.  It seems that whenever a shop gives out one of those handy calico bags for life I find a new knitting project to fill it.  If you look at my ravelry page you might think that too-much-stuff-on-the-go is not one of my vices but you would be wrong.  I just don't get around to posting the WIPs.  My resolution was not to work on only one project at a time but to have less and to finish up everything that had been sat in a bag for more than a year.

With that in mind I am working very hard on my vintage cardigan.  I am nearly there, 


but I have recently experienced a return of the Old Trouble.  I bought a Swift and cannot resist playing with it and winding off the odd skein or two


 And then my attention alighted on this


Swiftly Swifted it became this


There are 800 yards of aran weight Araucania, after a search on Ravelry (it is so easy to search under yardage, weight,, style - its Google for knitters) I came up with this which the pattern says can be made in any size from size 8 up to HUGE with 750 - 1,500 yards of aran weight

© Spoked cardigan by Carol Feller
I need to make a medium sized version - very roughly I  would need 1,100 yards for this sweater. I realise I am asking a lot to make a sweater out of my yarn but there is far too much for a cowl and its too chunky for a shawl so I am stamping my feet and shouting I WANT A SWEATER.

So here is a possible solution, I have another 300 yards of a very similar colour in DK weight.  I figure the slight variation in colour will not matter as all the yarn is hand dyed and varies quite considerably (the producer recommends to knit with two balls in alternate rows to blend the colours.  As for weight, I'm thinking I shall knit all the ribbing in the DK, as the main body is knitted side to side and the ribbing added later.  What does anyone think? (and dont worry about telling me to finish the vintage project first - I'm already telling myself that!)

extra DK yarn in the centre

xx

C

PS My old college is Lucy Cavendish its well worth checking out the website,r even if setting off fo university is farthest from your mind at the moment.  I first read about the college in a women's magazine when a nurse on night duty.  I cut out the article and pinned it to my kitchen notice board.  The cutting was old, yellow, and curly before I took it down and seriously considered completing my education.