Pages

Showing posts with label Titanic. Show all posts

Tuesday, 31 July 2012

Wearable vintage

I began making this sweater just for fun, a challenge to myself to see if I could knit something from a photograph.  This photograph


Oh no! not this one... this one is mine - three months of thinking, planning, writing notes and crossing out
and I got there -

from here...


via here...


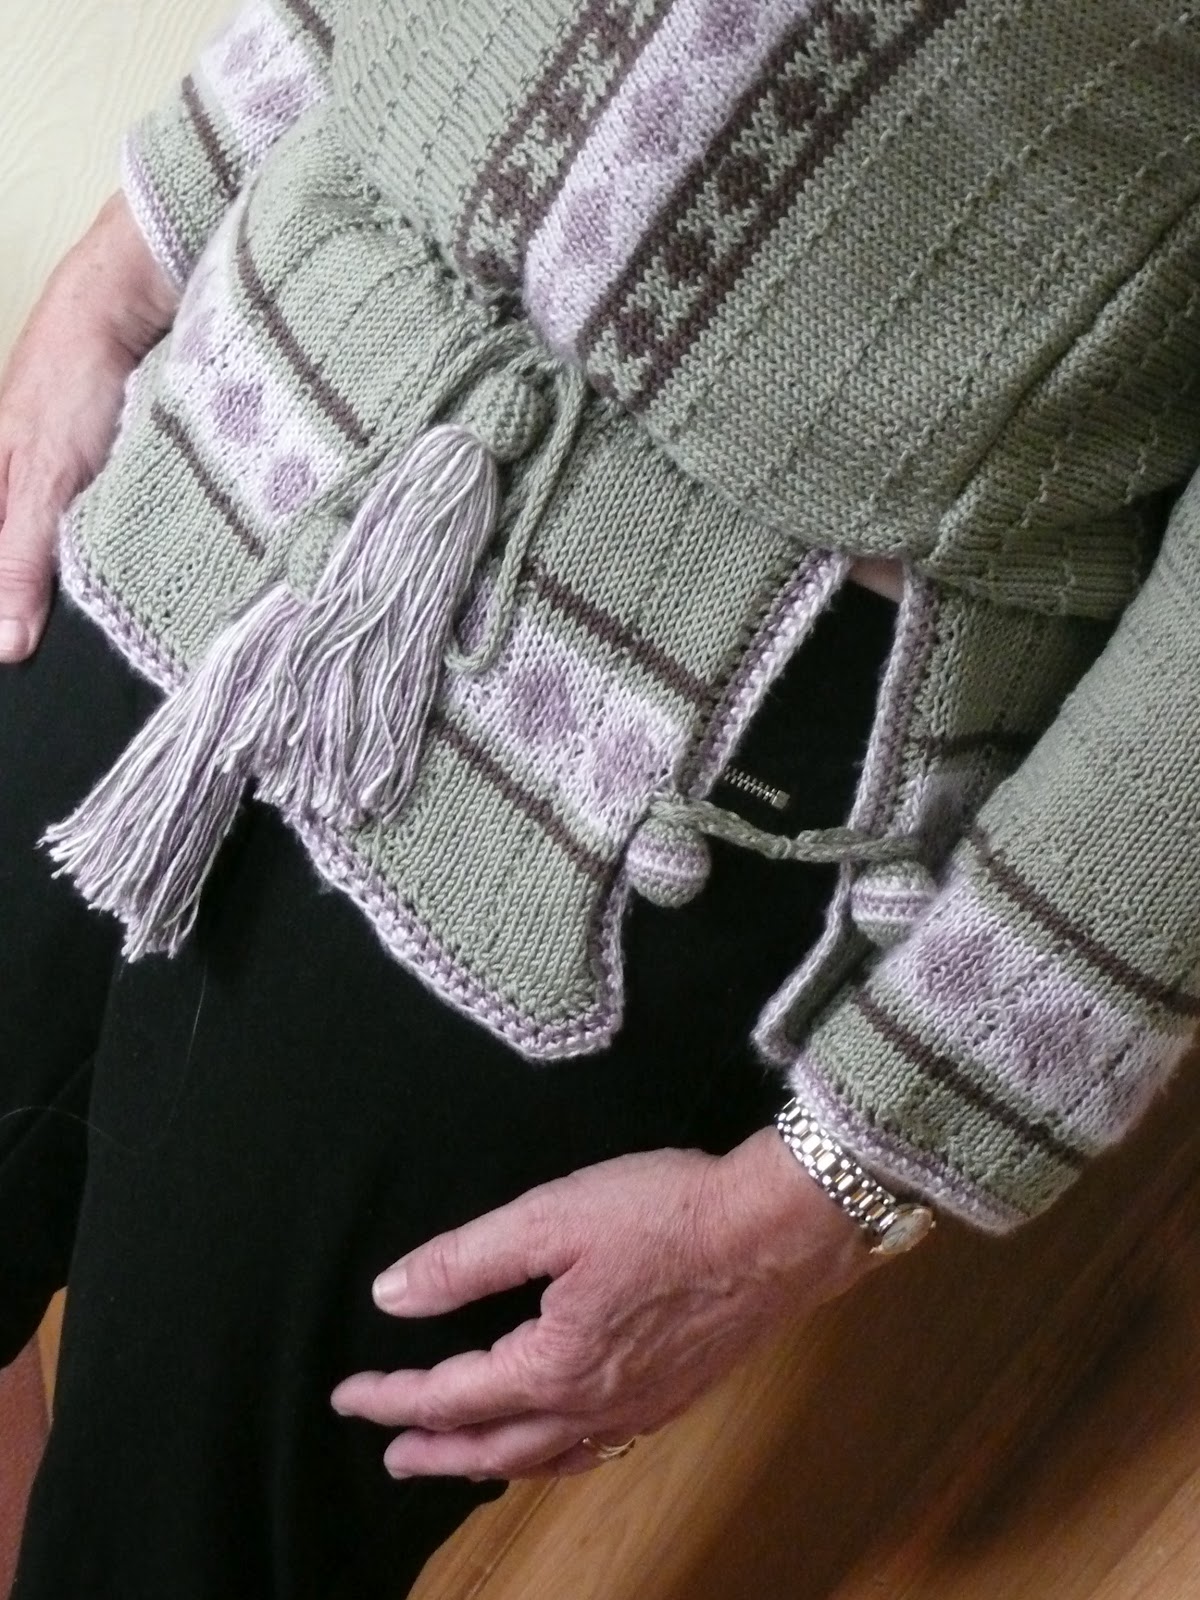
I have simplified it, by knitting the main body sideways from cuff to cuff via the front and back I could knit the colour work panels fair-isle fashion and not as intarsia, much quicker.

The finished piece was HUGE and took over half the dining-room floor when I blocked it. Sewing up took ages too.  Does anyone else use safety pins for this?  It made it much easier to keep the lines matched up


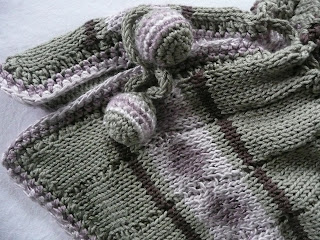
All the little crochet detail were interesting too.  The fillets at the shoulders allowed for some fullness rather in the same way as one gets from a shirt with a yoke


And I loved the bobble buttons


and the tassells


Loved making them too


When I joined the Titanic sewing project the choice of patterns was wonderful but when I looked around there are far less things to knit.  Hats gloves and mufflers a-plenty, baby things too but not actual items of women's clothing.  Perhaps knitting was mainly confined to shawls and working men's sweaters.  So I was thrilled to find this which is spot on for the period.  Spot on for the style too.  I realise that many of the women in steerage would have kept themselves warm with a shawl but the patterns we are making up are more of the style of the 2nd class passengers and although this tunic is probably designed by Poiret, someone who would have dressed the first class passengers, I see no reason why a 2nd class passenger who was able to knit could not also copy.

My mannequin, still decked out in 1912 blouse, skirt and underpinnings wears the tunic well.


I too shall wear it, with something more modern such as a pair of straight legged jeans


The pattern I devised is available as a Ravelry down load if you would like to make one too.  If you do please let me know - I would love to see other versions

xx

c


Tuesday, 17 July 2012

On negative ease and learning from the past

It took me a little while to feel as comfortable as this in my new skirt and sweater but I got there in the end


When I made this skirt for the Titanic project the fit was so good that it got me thinking.  I wondered what it would look like made in a contemporary style.  When I say contemporary I mean short, there was no need to mess with the shape in any other way at all.  I made a few little modifications like using a zip fastener under the scallops.


I still did lots of hand stitching as I felt the skirt went together better that way.  It is made entirely with stash fodder, the gunmetal coloured linen was bought a while ago on a visit to Goldhawk Road and the ribbon left over from a previous project, rummaging around in my work-basket I found the right colour cotton and zip.

I loved the skirt it looks perfect in its 21st century guise, I expect to make it again and again and I love the little Tana Lawn shell top, Sorbetto, from Colletterie patterns (it is a free download at the moment)  But not together,


So delving into the stash boxes again I came up with three skeins of Manos Del Uruguay silk and merino blend in just the right colours.  A search on Ravelry came up with the perfect pattern from Ram Wools Yarn Co-op.


The largest size was a 36inch - too small for me so I swatched (yes I truly did) and added stitches to give me an extra 2 inches round.  I also decided to go for an all stocking stitch construction with curly edges.  This is when I discovered what negative ease is.  It was huge and only looked OK if I grabbed a handful at the back and smoothed out some of the curlyness.


It was just a Sloppy Joe and not the look I wanted at all (I should have learnt from the way Sorbetto was the wrong shape).  So I pulled it all out and made it up in the 36inch size, obeyed all the pattern instructions and VOILA!


So, negative ease - knit a sweater that you want to fit snugly about 2inches smaller than your bust size then it will fit not hang.


xx

C

Tuesday, 3 July 2012

On having to admit that these clothes maketh this woman into a Grandma

Of all the discoveries I have made while working on the Titanic project I did not expect to be seeking out the Brasso


But more of this later...  The latest Titanic project felt a little like going off piste without a map.  The #0219 blouse which came with pattern and a photograph but no instructions


Now I've made plenty of blouses before, with collars and cuffs and curved yokes, even one from the project how hard could it be?

The pattern size was several inches too small for me so I slashed the pattern and spread it to give me 4 inches extra all round.


This piece is side front and back and one sleeve, cut on the cross (bias).  At this stage I imagined the slashes at the underarms were darts but did wonder why the pattern numbers did not match up...

(NB these patterns do not have balance points as we know them in modern patterns but there are numbers at strategic points on each piece and as you sew you match 30 to 30, 31 to 31 and so on)

So I went merrily on my way, interfacing the yoke and centres, collar (cut from white medium weight linen) and cuffs with light weight fusible interfacing


Attaching the piping to the centre front, yoke, and centre back section first using the cording foot of my machine.  Then, with the same foot attaching the yoke after clipping curves and corners


Next comes the underarm  and side seams - EEK! they do not match in length and that slashed part is not a dart.  Saved by the project blogs, people have gone before me.  The seam from hem to cuff does a sort of dog-leg turn at the underarm.

I still found it tricky.  Particularly as my fabric is a very fine floaty 50/50 cotton silk mix and frays very easily.  In the end I machined the sleeve from cuff to the turn and the side seam from hem to turn then stitched the horizontal piece.  At first the seam looked puckered and you can see that it is made of 3 separate lines of stitching.


But after pressing and when on a real arm rather than my dummy it fits quite well


Now buttons and button holes (and Brasso).  A friend from my knitting group had given me some vintage buttons and this blouse seemed the perfect garment for the set of grey Bakelite ones.


Bakelite was developed in 1907 and patented in 1909 and is the first ever plastic.  It was not actually produced commercially till the 1920s and 1930s (certainly in any great quantities) but the buttons are nearly from the right era.  Although there is no Bakelite label anywhere,they are certainly of a plastic like material and have the characteristic bloom that develops on old Bakelite. So armed with the tin of Brasso which according to a website for collectors of Bakelite is The Thing for cleaning it up I got polishing with nice shiny results.


While I'm on the subject of buttons, I fund three white buttons styled like collar studs in my button boxfor fixing the collar to the narrow bias neck band, two at the front and two at the back


I have found that patterns of this age tend not to supply pattern pieces for parts that are simply a rectangle, square or strip, the instructions simply giving measurements.  And here I needed to improvise for neck band, cuffs and binding for the lower edge.  

The neck edge I bound with a bias strip, applied not as a facing but as a stand up binding to give something to button and snap the collar on to.  As well as the button at the back I attached press studs to the front and sides of the band and on the collar.  Securing at these four points seems to keep the collar in place neatly

The cuffs were easy, choose your depth, measure your wrist size, add 1.5inches overlap and seam allowance to all four sides, cut four.  I slashed a 3 inch sleeve opening about 4 inches up from the underarm sleeve on the outer aspect of the sleeve, binding the raw edges with a strip of bias binding cut from the main fabric.   Gathering the lower edge of the sleeve to fit the cuff, less teh overlap I attached the cuff in the usual way

For the lower band I decided to make a wideish band that would sit comfortably on my waist and lie flat under a skirt waist band so I cut a 5 inch wide strip the length of my waist measurement plus 2 inches for overlap and seams.  I gathered the lower edge of the blouse (side front and back sections only) on to one edge of the band making sure the overlap matched that on the blouse itself, folded it in two, machined across the ends, snipped corners turned it right side out and  turned and hemmed the inner long side to the line of machine stitching.


Now for the great try on.  I decided to wear it with my scallop edge skirt and with full underpinnings.  How exhausting is that dressing in chemise, corset and  princess slip before getting to the top layer?  I needed a short rest while still en dishabillé


And here we come to the meaning of my bog title.  I really look like a grandma once properly buttoned up


And since I do, I thought I would add the glasses


Now for the VPLL1912 checklist


VPLL Checklist
  1.  Pattern Name Ladies blouse #0219
  2. Sewer’s Skill Level: Advance, 
  3. Pattern Rating:  4 - I nearly loved it as much as the #0335 blouse.  It is perfectly right for the period but it drops a point for lack of glamour.  I realise everyone has to have a workaday blouse and this one says school marm all over it but I do prefer the chance to use lots of lace and the feel of very wide sleeves.  But in technical terms the pattern certainly deserves a 5 as it went together perfectly.  Given the eccentric way I worked the underarm and side seam if the measurements were not exact it would have been all over the place
  4. What skill level would someone need to sew this pattern and why? I say advanced because of the under arm bit but probably if the blouse is made in some sturdy cotton poplin possibly the tricky seam would be easier to work
  5. Were the instructions easy to follow? No instructions of course but the blogs were very helpful
  6. How was the fit/sizing?  The sizing was accurate and by adding the 4 inches as described above it was a perfect fit for me (I am 2 sizes bigger than the original pattern)
  7. Did you make any pattern alterations? yes, 
    1. I made the pattern bigger as described above 
    2. I made the collar stand from a strip of bias binding.  Another time I think I would have used the white linen I made the collar of and make it slightly wider (say 3/4 inch)
    3. I made the waist band wider than a simple binding, it stayed put better under the skirt.
  8. Other notes
    1. I machined the button holes - big confession I know, there were no machine made button holes in 1912 but I had 15 to make and I needed to save time
    2. I made the bow from a wide bias length of silk crepe de chine sewn into a tube, turned and loosely tied into a bow


xx

C


Tuesday, 12 June 2012

At the halfway point

Its high time I posted about knitting again.  I have got so immersed in sewing (and I'm dying to tell you about my latest acquisition but I shall have to save that till another day) I have neglected to chat about knitting.  But I have still been working hard behind the scenes on my Titanic related knitting project


After some swatching I decided on using the two shades of pink in the Debbie Bliss Pure Silk for the lozenge pattern.  I like the different textures as well as the colour contrast.


As you know I have no pattern for this, only a good photograph from Vintage Fashion Knitwear by Marnie Fogg.  I am trying to keep to the way I think the sweater is constructed, which is not the way of modern patterns, but also I am looking at ways of streamlining the process.  I have no technical skills for creating knitting patterns, I rely on keeping to the tension of my swatch for measurements and otherwise a 'suck it and see' (or knit it and rip it) approach.  And for time to time pinning out what I have made and seeing if it looks anything like the shape I have in my mind's eye.

I knitted the front and back peplums separately first on their own they look like nothing on earth.


But things are now taking shape


Having knitted the peplums and crochet a row of eyelets along the top I began the main body knitting up from the bottom of the sleeve, This time I have knitted the bell cuff continuous with the sleeve and made the eyelets by the yfwd k2tog method.  I am going for dolman sleeves, hoping the inc1 each end of every knit row will give me the necessary ease for the armhole.  There is another row of eyelets across the yoke, so that I can get some ease in I am knitting the front and back separately then the yoke, I will hand sew the yoke in to get the ease.

At the moment I intend to knit the sweater in two halves casting off with the 3 needle method on the right side centre front and centre back but if that does not look right I will graft it like the toe of a sock.  All the edges are then finished off with several rows of DC.


I am note taking as I go along but I also change my mind a lot!


xx

c

Tuesday, 29 May 2012

museum treasure

Anyone exploring Dorset with small children will know about the dinosaurs.  Known as the Jurassic coast, in the 19th century it was not unknown for fossil hunters to find (and plunder) entire dinosaur bones poking out of the cliff after a land fall.  In the county town Dorset there is a great little dinosaur museum, but there is also a gem of a county museum

Victorian Hall


Now I'm not expanding into museum promotion, although the eagle eyed of you will have noticed I have changed my by-line a little by adding (and other stuff) I am not extending my repertoire  that far.  Rather in the town museum I came across treasure that linked to my current enthusiasm, the great Titanic sew-a-long led by the wonderful vpll1912  The collection is small but contains four or five century's worth of clothing cast offs from the citizens of the county.  Because old cloth is so fragile and light sensitive the collection is rotated and how lucky was I to find on the day I went that they were showing off their Edwardian collection?  Titanic gold!

Black Ascot 1910

In 1910 the King had died just before Ascot, all the occupants in The Royal Enclosure wore full mourning, the meeting was known as The Black Ascot.  It is not inconceivable that one or two of those strolling the Royal Enclosure would be travelling first class on the Titanic two years later.

In the passenger list were agricultural workers from Dorset and the surrounding counties of Somerset and Hampshire.  I could imagine they may have gazed into this shop window on the High Street or one very similar in their local town.

Evans hatters in Dorchester High Street

Any agricultural worker travelling third class to a new world with new opportunities would most certainly have worn a sun bonnet, like one of these, when working in the fields or walking into town on market day.

Sunbonnets


Would they have packed them in hopeful anticipation of walking in their own corn fields in the mid-west?


Gloves and...
parasols

(No lady would have been seen without them on a sunny day)

Loved the...

fans


evening bags
and the...
I have just bought some pleated fabric like the cream on the left to trim my ladies' mantle (coming up soon)

I found it so poignant reading all the small details  in Titanic Lives by Richard Davenport-Hines, the possessions they took with them on that fated journey, their back grounds and their family relationships.  If anyone took a sewing machine with them, as some women surely did, it will still be at the bottom of the ocean together with so many other private possessions, known to be useful of believed to be beautiful. 

like one of these (possibly)


No 1st class gentleman would travel without it

Hats certainly wanted on voyage

I could have stayed longer but my companions had finished looking at the geological exhibits (and the Romans) and Thomas Hardy's study and were ready for tea.

xx

C

hand sewing inspiration