Pages

Showing posts with label VPLL1912 project. Show all posts

Tuesday, 3 July 2012

On having to admit that these clothes maketh this woman into a Grandma

Of all the discoveries I have made while working on the Titanic project I did not expect to be seeking out the Brasso


But more of this later...  The latest Titanic project felt a little like going off piste without a map.  The #0219 blouse which came with pattern and a photograph but no instructions


Now I've made plenty of blouses before, with collars and cuffs and curved yokes, even one from the project how hard could it be?

The pattern size was several inches too small for me so I slashed the pattern and spread it to give me 4 inches extra all round.


This piece is side front and back and one sleeve, cut on the cross (bias).  At this stage I imagined the slashes at the underarms were darts but did wonder why the pattern numbers did not match up...

(NB these patterns do not have balance points as we know them in modern patterns but there are numbers at strategic points on each piece and as you sew you match 30 to 30, 31 to 31 and so on)

So I went merrily on my way, interfacing the yoke and centres, collar (cut from white medium weight linen) and cuffs with light weight fusible interfacing


Attaching the piping to the centre front, yoke, and centre back section first using the cording foot of my machine.  Then, with the same foot attaching the yoke after clipping curves and corners


Next comes the underarm  and side seams - EEK! they do not match in length and that slashed part is not a dart.  Saved by the project blogs, people have gone before me.  The seam from hem to cuff does a sort of dog-leg turn at the underarm.

I still found it tricky.  Particularly as my fabric is a very fine floaty 50/50 cotton silk mix and frays very easily.  In the end I machined the sleeve from cuff to the turn and the side seam from hem to turn then stitched the horizontal piece.  At first the seam looked puckered and you can see that it is made of 3 separate lines of stitching.


But after pressing and when on a real arm rather than my dummy it fits quite well


Now buttons and button holes (and Brasso).  A friend from my knitting group had given me some vintage buttons and this blouse seemed the perfect garment for the set of grey Bakelite ones.


Bakelite was developed in 1907 and patented in 1909 and is the first ever plastic.  It was not actually produced commercially till the 1920s and 1930s (certainly in any great quantities) but the buttons are nearly from the right era.  Although there is no Bakelite label anywhere,they are certainly of a plastic like material and have the characteristic bloom that develops on old Bakelite. So armed with the tin of Brasso which according to a website for collectors of Bakelite is The Thing for cleaning it up I got polishing with nice shiny results.


While I'm on the subject of buttons, I fund three white buttons styled like collar studs in my button boxfor fixing the collar to the narrow bias neck band, two at the front and two at the back


I have found that patterns of this age tend not to supply pattern pieces for parts that are simply a rectangle, square or strip, the instructions simply giving measurements.  And here I needed to improvise for neck band, cuffs and binding for the lower edge.  

The neck edge I bound with a bias strip, applied not as a facing but as a stand up binding to give something to button and snap the collar on to.  As well as the button at the back I attached press studs to the front and sides of the band and on the collar.  Securing at these four points seems to keep the collar in place neatly

The cuffs were easy, choose your depth, measure your wrist size, add 1.5inches overlap and seam allowance to all four sides, cut four.  I slashed a 3 inch sleeve opening about 4 inches up from the underarm sleeve on the outer aspect of the sleeve, binding the raw edges with a strip of bias binding cut from the main fabric.   Gathering the lower edge of the sleeve to fit the cuff, less teh overlap I attached the cuff in the usual way

For the lower band I decided to make a wideish band that would sit comfortably on my waist and lie flat under a skirt waist band so I cut a 5 inch wide strip the length of my waist measurement plus 2 inches for overlap and seams.  I gathered the lower edge of the blouse (side front and back sections only) on to one edge of the band making sure the overlap matched that on the blouse itself, folded it in two, machined across the ends, snipped corners turned it right side out and  turned and hemmed the inner long side to the line of machine stitching.


Now for the great try on.  I decided to wear it with my scallop edge skirt and with full underpinnings.  How exhausting is that dressing in chemise, corset and  princess slip before getting to the top layer?  I needed a short rest while still en dishabillé


And here we come to the meaning of my bog title.  I really look like a grandma once properly buttoned up
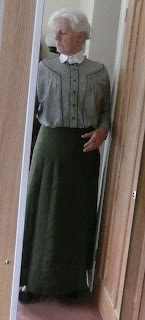

And since I do, I thought I would add the glasses


Now for the VPLL1912 checklist


VPLL Checklist
  1.  Pattern Name Ladies blouse #0219
  2. Sewer’s Skill Level: Advance, 
  3. Pattern Rating:  4 - I nearly loved it as much as the #0335 blouse.  It is perfectly right for the period but it drops a point for lack of glamour.  I realise everyone has to have a workaday blouse and this one says school marm all over it but I do prefer the chance to use lots of lace and the feel of very wide sleeves.  But in technical terms the pattern certainly deserves a 5 as it went together perfectly.  Given the eccentric way I worked the underarm and side seam if the measurements were not exact it would have been all over the place
  4. What skill level would someone need to sew this pattern and why? I say advanced because of the under arm bit but probably if the blouse is made in some sturdy cotton poplin possibly the tricky seam would be easier to work
  5. Were the instructions easy to follow? No instructions of course but the blogs were very helpful
  6. How was the fit/sizing?  The sizing was accurate and by adding the 4 inches as described above it was a perfect fit for me (I am 2 sizes bigger than the original pattern)
  7. Did you make any pattern alterations? yes, 
    1. I made the pattern bigger as described above 
    2. I made the collar stand from a strip of bias binding.  Another time I think I would have used the white linen I made the collar of and make it slightly wider (say 3/4 inch)
    3. I made the waist band wider than a simple binding, it stayed put better under the skirt.
  8. Other notes
    1. I machined the button holes - big confession I know, there were no machine made button holes in 1912 but I had 15 to make and I needed to save time
    2. I made the bow from a wide bias length of silk crepe de chine sewn into a tube, turned and loosely tied into a bow


xx

C


Tuesday, 1 May 2012

Perfect Blouse For Showing Off #0335

When I came across this antique lace in my late mother's sewing box I knew I wanted to make one of those high necked, tucked fronted, blouses as soon as a pattern became available for the VPLL1912 project .  The lace is machine made in the Honiton style from sometime in the early part of the last century.

From my Mother's lace stash

And the #0335 blouse is perfect to carry off the lace

#0335 Ladies Blouse March 31 1912 

*The pattern comes in a size 34" bust and as I want to wear  it myself over the correct underpinnings I needed to 
  • add 10 inches  to the bust measurement, 
  • enlarge the armhole to make it 2 inches deeper
  • increase the collar size to 15 inches 
  • add 2 inches to the length of the body.  

I like to use the large format pattern.  I know some people find printing is very costly but my local print shop charges me £10 per pattern which seems a good deal to me when compared to all that printing off on A4 and getting tied up in sticky tape.  This means I need to use the slash and spread method for enlarging patterns (I will try the pattern maker soft ware one day!)

front pattern piece with extra width at neck and shoulder and extra length

I enlarged the body in two places, 1/2" at the neck line to increase the collar size, giving me 2" all round and 2" at the shoulder, another 8" making 10" in all.  I would have liked to keep the original look of the blouse with tucks right across the front.  But that would have required adding 3 times as much to the cut width (i.e. 6" each side to increase the finished width by 2).  Unfortunately I just didn't have enough fabric so I added just 2 inches and spaced the large tucks out a little more to keep some symmetry  I made similar adjustments to the back. By adding 2inches to the depth of the armhole I also got the additional length to the body.   

I enlarged the collar by the same amount as the blouse neckline.  

Collar enlarged to 15"

The main fabric is cream cotton percale (a bargain-bin valence for a single bed!) it's soft and drapey with a gentle sheen.  As the flat part of the sheet was equivalent to 2 yards of 36inch fabric (narrower than the yardage in the pattern instructions) and the valence itself a 6 yard piece 18inches wide I cut the large sections out of the flat sections and the smaller pieces from the valence.  Enough for the enlarged blouse but little left over.  The lace was just enough for the two cuffs, the collar and doubled up for the front panel.   Because I was going to apply the lace at the end (so that I could remove it for washing) I cut four cuff and two collar pieces from the cotton percale.  I did not cut lace or cotton for the Centre Front Lace (more of that later).

I read the pattern instructions and studied the picture before cutting out.  One thing I would say about the cutting instructions, in the list of pattern pieces I think it would help modern sewists to have a sub heading for those pieces that are cut by measurement only (i.e. no paper pattern pieces).  I was puzzled for a while as to where the piece for the cuff was and missed the Centre Front Lace altogether till I got to the part in the instructions explaining how to fix it  (then I left it out!).

Making up begins with the tucks - the main difficulty here is keeping them straight.  AFTER making the blouse I bought a pin tuck foot for my machine.  Had I had that when making the tucks I would have used it for the narrow ones.


Tucks

The pattern instructions called for lapped seams.  In many UK sewing manuals they are called run-and-fell seams.  When googling this to make sure I was right about the two names for this technique I was amused to see that this is also a method for joining sheet steel!


Run-&-fell (or lapped) seam

As the instructions suggested one could edge the blouse armhole with narrow ribbon or piping, I took this as permission to pipe every seam.  In my bits and pieces bag I had an old silk nightdress, already made on the cross, I cut strips and strips of the silk and used piping liberally.

Piped seams

The instructions are fairly straight forward except where they described fitting the collar.  I could see from the picture that the collar fastened to the left, close to the shoulder seam and the instructions referred to the neck seam being left open from the shoulder seam to the front opening, but I couldn't quite see how that would work and I was not sure how I would work the Centre Front Lace

I was hoping that the instructions would become clearer as I went on but when I got to it I was still confused.  The main collar clearly opened at the front and then there was an overlapping Centre Front Lace piece applied to one side of the collar to fasten at the other side.  And logically that side would be on the wearers left to follow the way the front placket fastened.

So why suggest leaving the right side of the collar seam open from shoulder to centre front (instruction point 21) ?

I would be really interested to read what other makers think of this, I may simply have got the wrong end of the stick.  But my feeling is that at point 19 the instructions should advise attaching the  Centre Front Lace  to the right (wearer's right) side of the front collar and 

Point 21 should read;-

Join the collar to the blouse (right side of blouse to right side of collar), matching corresponding numbers, taking care not to catch the Centre Front Lace in the seam.  On inside turn under raw edges and hem to the neckline seam

Then point 22

Attach hooks and eyes (or cotton loops ) to the centre front opening and a further set to the free end of the  Centre Front Lace  and the blouse shoulder.

I think that would do it!  On the other hand I did not make a  Centre Front Lace  at all and instead added a cameo brooch. (I could always add the Centre Front Lace later)

collar fastening at centre front with hooks, eyes, and a cameo

Because I wanted to be able to remove the lace I didn't make button holes on the cuffs.   Instead I made button loops with the same up-cycled cream silk as the bias strips for the piping and again piped the edges of the collar and cuffs and wrist openings.    The instructions (point 14 ) suggest creating an optional sleeve reveal.  But I don't know what that is and google is no help.


collar and cuffs before application of lace to show silk piping and button loops

The buttons are vintage black glass with gold decoration from The Button Queen. they too must be removed for washing.

Glass buttons from 1910

For the front placket, under the lace band, I have used little mother-of-pearl buttons and (my one compromise to using 1912 materials and techniques) machine made button holes.  


Front placket fastening under lace centre front band

I attached the lace with tiny stab stitches.  The instructions for the cuff called for tucks in the lace, on my blouse I made what tucks were necessary to make the pieces of lace fit.  For the front I had to craft an invisible centre seam as the lace was not wide enough, nor did it have a finished scallop edge on two sides.  I overlapped the lace matching the tendrils

I did not gather up the fullness at the back and when I gathered the lower edge I bound the edge with more of the silk


Finished

I am thrilled with the result, the blouse looks very fine with the scallop edge skirt and gradually dummy/model is getting dressed


Nameless dummy fully dressed
VPLL Checklist
  1.  Pattern Name Ladies blouse #0335
  2. Sewer’s Skill Level: Advance, 
  3. Pattern Rating:  5-I LOVED IT! I forgave it its collar problems, it's such an emblematic style - the high collar, lace and tucks all say this is 1912 to me
  4. What skill level would someone need to sew this pattern and why? At least intermediate, probably advanced.  I'm ignoring the collar problem as I assume it will be sorted out but still the work on the tucks, collar, cuffs and sleeve is not for beginners.  I would suggest practising these skills on a modern pattern first
  5. Were the instructions easy to follow? Mostly but the collar attachment and fastening (assuming it is to be fastened on the side and the pattern re-drawn) needs to be re written once the technique has been perfected
  6. How was the fit/sizing?  the fit was fine once I enlarged it as described above
  7. Did you make any pattern alterations? yes, 
    1. I made the pattern bigger* as described above 
    2. piped all the seams (no run-&-fell)
    3. made the collar** without the Centre Front Lace
  8. Other notes
  • I suggest above how I might revise the instructions for attaching the collar
  • I would add a sub heading in the cutting list to make it clear where a piece is cut by measurements only
  • what is a sleeve reveal? and are there any instructions?


xx

c

lacy shadows

P.S. If you have been following my posts about the Titanic Project being run by the Vintage Pattern Lending Library you will know all about what I'm up to.  But even if you have, you might like to visit the website again as they have made all sorts of helpful changes.  The project has grown to close to 500 participants and Janyce and Kim at the VPLL have worked so hard to make the sharing of patterns with participants so much easier and gained a lot of new helpers.  There's a facebook page too 

Tuesday, 10 April 2012

Hats off!


I wear hats, sometimes for fun and sometimes for warmth, I wear them on snowy days, sunny days and wedding days.  But there was a time when women would not go out without a hat, particularly mature women like my grandmother.  I just remember her in the 1950s when she was in her late 60s and, true to her upbringing in the early part of the 20th century she thought it was positively improper for women to be seen outdoors without a hat.  Hats (and gloves) were for correct, respectable dressing, not just for fun and vanity.

So when the latest Titanic challenge came along with the description, Mature Ladies hat it made me smile and remember my grandmother... but it also made me frown.


I earmarked some silk dupion from my stash, bought some tape and some buckram, printed off the instructions and considered using a hand printed silk velvet scarf in some way as a trim.  

But I had never made a hat before and this one came with a set of rather confusing instructions and no pattern.  I decided to wait until others on the vpll1912project had made hats and blogged about them.  I have never joined a group sewing project before but this is the big advantage, everyone sews at their own speed and blogs about their successes and problems they have solved which helps the rest of us.  Before plunging my scissors in I read blogs from Liondefleur and Pam


Two basic shapes - a crown, and sides that slope outwards towards the top and at the bottom a band that folds under and tapers to one's head circumference (the tabbed section with notches cut in it).  Essentially one has a stylised toque that stands a little bit away from the head.


To get the crown right I needed a little height.  Steaming the oval of buckram over a saucepan and moulding it on a pudding bowl gave me roughly the right shape


Before fixing the crown to the sides I cut an oval of silk about twice the size of the buckram crown and loosely pleated it over the dome, fixing with small stab-stitches where I wanted the folds to go (I was aiming for a walnut whip sort of arrangement).

Before attaching the silk to the sides I cut a piece of tape to fit my head circumference, folded under all the tabs at the bottom edge (you can see how I cut the tabs on the picture above) and fitted them to the tape. Then I tacked the whole piece into a ring shape by creating a back seam.  

Thus I now had  the hat in two pieces, a crown covered with silk, and the as yet undraped sides sloping outwards towards the top and folded under at the bottom edge.  Inside it funnelled into a diameter to fit my head.

The silk for the rest of the cover was cut twice as deep as the buckram.  Now I know the hat in the sketch looks a little as though it is based on a wonky concertina but I wanted rather more fluid folds.  First I tacked four equal sized pleats at the front, back and the middle of the sides only, still leaving plenty hanging down to turn under as a lining.  Once I had pulled up the pleats I messsed them up a bit and tacked them in place just as it took my fancy - like this...


I then pushed all the spare fabric hanging at the lower edge up inside the hat to form the lining fixing a small crown of silk at the top of the inside to cover over all raw edges.  I reckoned that the extra folds of silk would pad out the inside of the hat and help it to fit snugly.  I made the whole hat by hand, no machine stitching.  There were no time consuming lengthy seams but the main reason was it is easier to tweak the shape as you go to get the drape of the fabric just right.

I mentioned at the beginning that I was going to try and use a velvet scarf as a trim.  But this scarf is made by my very clever cousin Sharon Verry  (she works as part of an artists cooperative in Cornwall called the Guild of Ten ) and I had no intention of destroying it, I needed to find a way to use it in a whole piece.


In the end I didn't, the scarf, it was too bulky, a small scrap of the fabric highlighting one or two of the folds would have been fab but I don't have any small scraps!  So I contented myself with a small corsage of feathers instead.  The hat is quite comfortable, I think to feel totally secure I would need to employ a hat pin or two but other wise I feel rather glamorous in it


xx

c

VPLL Checklist

  1. Pattern Name Spring Hat for Mature Woman
  2. Sewer’s Skill Level: Advance
  3. Pattern Rating:  I LOVED IT! there was no pattern, I was helped by others who had experimented with the shape and blogged their measurements   
  4. What skill level would someone need to sew this pattern? Intermediate.  The sewing is not really difficult (I did all mine by hand to help create the shape as I sewed) But you need a bit of courage to follow your instinct
  5. Were the instructions easy to follow? The instructions were fairly short, I had to use my own experience, improvise and see what others made of it to pull the whole thing together.  The illustrations were the most help
  6. How was the fit/sizing?  The construction allowed me to get the fit just right (see my comment about using tape above)
  7. Did you make any pattern alterations? There wasn't a pattern exactly but I did make the front lower as other bloggers had advised
  8. Other notes:  It's so glamorous!


PS I am making progress with the tunic  I may have mentioned my big failing as far as knitting is concerned - I have the bad habit of not knitting test pieces.  However, in this case there are several reasons why I simply  must play around with yarn and stitches.  I have no pattern, no idea what some of the colours will look like once knitted up and am not even quite sure what some of the stitches are.  So what I knitted was more in the way of a random sampler than a tension square.


BUT I know what I am going to do now.  I have gauge, colours (I am going for the colour way at the top of the piece) and I have some idea how I will combine crochet with knitting to get the right effect.  I still have to figure out the tassels but I can leave that till most of the tunic is done.


Monday, 19 March 2012

The third post

Not my third blog post ever but Titanic #3  A ladies skirt from February 4, 1912 (VPLL 0200)  I received the pattern as the largest size pdf and took it to my local print shop as before.

In size 34" waist it looked as though it was going to fit me without alterations (and without contemporary underpinnings being absolutely essential).  When I made the Princess Slip I had to compromise on trimmings and use lace made from synthetic fibre, but for this project I do want to use materials that are as close to the contemporary fabrics and notions as possible.  My local fabric shop was able to provide linen in gooseberry green, cotton binding in french navy and cotton tailor's canvas.   Nothing synthetic in sight (except possibly the sewing thread)


The hooks and eyes and press studs (snaps?) are metal so could have been made in 1912 but I will defer to friends who have a much better knowledge of what-was-used-when to correct me if necessary. I cut the facing for the scallop edge as a straight piece to begin with and cut it to shape, after sewing.


Linen and cotton may crease with wearing (I don't mind a few creases, though some do) but it is also a dream to sew with, as when pressed it is possible to get a near perfect alignment.


I chose to use the contrast binding to trim the top of the waist (which is interlined with the canvas) as well as the scallop edge.


In the picture at the top of the blog you can see that I have 9 vintage style buttons laid out with my kit but I soon realised I had miscounted and needed 13.  I could have redrawn the pattern to create fewer, bigger, scallops but instead decided to use scraps of the cotton binding to make covered buttons.  A button making evening followed...


The finished effect pleases me enormously, although I admit to the edge being more saw-toothed than scalloped!


The front opening is closed with hooks and eyes.  When I tried it on the points gaped a little so I fixed the points of the opening with tiny  press studs  and lower down small tacking stitches. Being used to 5/8 inch seam turnings on modern patterns the 3/8 on these was a bit of a challenge, but it does work, even when neatening seams by turning under the seam allowance and stitching on the edge. The waist facing is blind hemmed along the natural waist line.


Now I do intend to make a corset from Corsets by Jill Salen (purely for the purposes of the clothes hanging correctly, of course!)   But even without tight lacing the skirt fitted quite well.  Authentically in fact, as after half an hour walking about my bedroom trying to get the right shot, I felt mildly breathless from the tight fit around my lower rib cage.


The blouse is modern (Anthropoligie) but I felt it had the right shape, pin tucks at the shoulders and softly draping sleeves.  

Some bloggers have provided details of how long a pattern has taken to make up.  I have again failed to time myself but estimate it took about 5 hours to cut out and machine sew (the pattern pieces fitted together effortlessly without any adjustments) and probably as long again on the hand sewing.  But I didn't rush it and I had fun!


xx

c

VPLL Checklist

  1. Pattern Name Scallop edge skirt  #0200
  2. Sewer’s Skill Level: Advance
  3. Pattern Rating:  I LOVED IT! the fit is really good (so glad some of those women in 1912 had a 34" waist!)   
  4. What skill level would someone need to sew this pattern? beginners with a little help I would say.  You need to do a bit of simple hand stitching and care to get the binding right but all the other shaping is in the seams
  5. Were the instructions easy to follow? Yes.  My only question was which way should the scallops face.  My instinct was that the opening should face the back but the pattern and instructions said otherwise so I followed that and put snaps on the points of the scallops at the opening and tacking stitches further down to avoid any gaping
  6. How was the fit/sizing?  yes exactly
  7. Did you make any pattern alterations? no
  8. Other notes:  The style would be great for contemporary wear too